Chili Like This Makes Foodies Warm

For me, any time of year is a good time for soups and stews. I’ve never participated in a chili cook-off to bring my own for competition, but I’ve certainly stood in as a willing judge. I love chili.

It’s taken me years to get a chili recipe just right and what I discovered is I needn’t follow someone else’s recipe. You know me—I cook by-guess-and-by-golly. So here’s how I make my chili. Sort of. The amounts of some of these ingredients will vary, depending on what I have on hand.
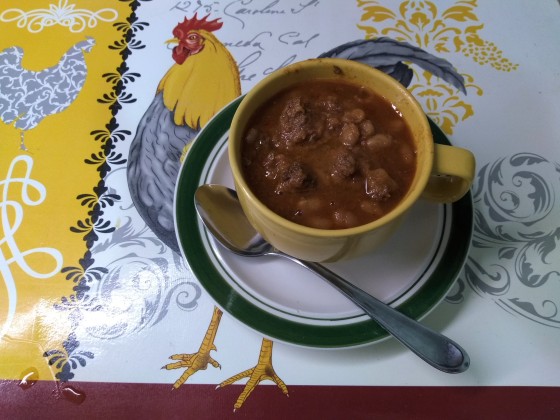
Chili, Sort Of

  • 1 can black beans
  • 1 can kidney beans
  • 2 cans pinto beans
  • 1 large can tomato paste
  • 2 cans diced tomatoes
  • 1 lb. 80/20 ground beef, cooked and drained
  • 1 small onion, diced
  • 1-2 t. chopped jalapenos
  • 1 T. chili powder
  • Tomato juice (optional)

Drain and rinse all the beans. Place all ingredients except jalapenos into a large slow cooker. If chili seems too thick, add tomato juice until it’s the desired consistency. Cook on high until chili comes to a slow boil. Stir once or twice to prevent sticking. Turn heat to low setting and add jalapenos. Cook for at least 3 hours until flavors are mixed.

Obviously, the by-guess-and-by-golly is a good idea for making chili. At least in my (cook)book.

I prefer to use dried beans. That way I know what I’m getting. If you do too, you have to make your measurements of the beans according to how much chili you want. I use a cup each of the beans, a little more for the pintos since I like them best for chili. I’ve found black beans take a little longer to become soft compared to pintos and kidneys.

Also, I process garden tomatoes and make my own tomato puree. I use this instead of juice to thin the mixture. In fact, I save the water from the blanching process and can it to use in soup stocks. Rarely does anything go to waste in my kitchen.

Along with chili, I like the cornbread as a side dish. This recipe for Cheesy Cornbread is from a friend who goes by Annie Mae. Since she wasn’t stingy in sharing it with me, I’ll share this one too.

Cheesy Cornbread

  • 1 can creamed corn
  • 1 can whole kernel corn, drained
  • 1 box Jiffy cornbread mix
  • 1 stick butter or margarine, melted
  • 1 egg
  • 1 c. sour cream
  • 2 c. shredded cheddar cheese

In a large bowl, mix the egg, both cans of corn, Jiffy cornbread mix, butter, and sour cream. Pour into a large casserole or 9 x 13 baking dish. Spread shredded cheese evenly on top. Bake at 350 degrees for 45 minutes.

Again, I alter the recipe slightly, but only so far as I use my own homemade cornbread mix. In that case, the equivalent to a box of Jiffy mix is about 1 ¼ cups of homemade mix.

Eat hearty!

Foodie Butchers a Bird

We’re going to learn about cutting up a fresh frying chicken today. Well, actually, I’d like to give some instruction and aid you with a video of someone doing it so you can get a good “feel” for how to handle the knife and the bird.

I learned how to cup up a fryer when I worked in a small grocery store that had a fresh meat case. Al, the butcher, taught me a lot about the various cuts of beef and pork and how to save money by using a fryer instead of buying the pieces already cut up. Since I was a young mother trying to save pennies, I was happy to watch him go through three or four chickens before I finally “got it.”

Some of the good reasons to learn and employ this technique:

  • Money saved per pound on chicken
  • Better use of the chicken parts, when done wisely
  • You get parts you like which aren’t found in “selected” packaging
  • Getting “back to basics”
  • A sense of pride in knowing a new kitchen skill

Let’s start with the money you save. It’s not going to make you rich, but when you’re trying to save any way you can, it helps. I mean, you shop sales, use coupons, and want BOGO offers, right? Well, there you go.

As for better use of those pieces, I’ll explain a little more of that later, but when the family likes both dark and white meat, you have it in one neat little package. Those parts you enjoy like the liver, the heart or gizzard are there too.

Notice how the wing ‘tips’ are saved for later.

You get a taste without having to buy a whole package of them, unless you want to do that. But even then, they’re usually frozen and most of us don’t prepare a whole meal of them at once. When you learn to cut up a whole fryer, you have the skill of a chef and a sort of “pioneer” attitude. (without having to catch the bird and pluck its feathers!)

Don’t worry about how much time you won’t save by cutting up your own chicken. This video of Alex from The Food Network shows her doing this is just over 2 minutes. You’ll get that good at it too.

I would add to her instructions that, when you cut those wings off first, be aware of the bones/joints attached to the wing portion. Once you make that cut into the skin, gently bend the wing away from the body of the chicken and then you can slice through. It’s mostly cartilage which gives way pretty easily. Same goes for the joint between the leg and thigh, which is something she mentions. Al taught me to feel for it with my finger; there would be a dip to slice into and then I could find the joint/bone. Always use a sharp, good quality knife.

Isn’t this fun and educational?

All right, now we get to some other practical considerations. You say, “My family isn’t into those internal organs or neck and back pieces.” That’s okay. They can be used, along with the carcass of the chicken, for making something you may or may not have heard of: bone broth. It’s something you make which yields a rich broth you can’t find in the store. “Why does that matter?” you ask. Because homemade broth has ingredients of which you know the origin. You don’t have to read the label.

Rather than type out my own recipe for bone broth, here’s a broth recipe which can be used for either beef or chicken. It’s very close to how I do it. Try a turkey carcass following your holiday meal too; it’s already roasted. (You may have to break the bones apart to get them in.) Beef bones, if not already roasted, work best when browned first for more flavor. Here’s another slow cooker recipe which uses slightly different ingredients. I like the idea of using a slow cooker because most of us want to use time wisely as well as using our money wisely. Besides, you don’t have to stand guard over it and cooking that way fills the house with great aromas.

Some great reasons for making broth:

  • Using every part of the meat you paid good money for
  • Saving money by not having to buy packaged broth
  • Knowing exactly what’s in your broth
  • Having it handy when you want it
  • Nutrients from the bones you wouldn’t normally get
  • Getting back to basics!
  • A new kitchen skill!

You can freeze broth in containers for use later. I use quart containers because that’s what I would have been buying anyway. Your call. Some cooks also can theirs. And don’t miss these excellent tips for making broth which come from the experts.

He doesn’t know what’s coming!


Eat hardy!